Wednesday, December 28, 2011

The Distracted Cook does NOT bake the bread!

Our Daring Bakers Host for December 2011 was Jessica of My Recipe Project and she showed us how fun it is to create Sour Dough bread in our own kitchens! She provided us with Sour Dough recipes from Bread Matters by AndrewWhitley as well as delicious recipes to use our Sour Dough bread in from Tonia George’s Things on Toast and Canteen’s Great British Food!

The only problem is that The Distracted Cook could NOT get this to work. Things started off nicely enough. Here is what the starter looked like with the first "brew" of the rye flour and water.


 Working right through the rest of the days was a snap. UNTIL! On Day Four, after the long wait, the result was NOTHING! That's right - nothing! No bubbles, not a one. What could have happened?

Not to be undone, The Distracted Cook started Day Four over again. And this time, a bit better of a result. Here you can see what the bowl held:


It is a bit better than nothing, so on it is to Day Five and the actual making of the bread dough. Ha! Look what the end result was after all of this work:


Not exactly what you would hope to see in that pan. So, into the plastic bag it goes to "rise" and shine. Oh no, not this bread! No rising, no shining. After the recommended amount of rise time, this is what we got:


If you are thinking that there is not much difference, you are correct. What to do? Well, let's just put it in the oven and see what happens! Good idea? Yes and no.


This is what came out of the oven pretending to be a loaf of rye bread. The Distracted Cook knows when to "fold them" and so this will be the end of this challenge. Not even to completion. Somehow this does not look like it will end up being a part of another dish. Sometimes you just have to admit that it didn't work and that a smile is as good as a sandwich!

Want to join in a sandwich or a smile? It's real easy - just go to The Daring Kitchen and sign up to take on future challenges. You will have fun, learn a lot about recipes and yourself, and we will be able to compare results. Or celebrate victory. Or have the last laugh!

Monday, November 14, 2011

The Distracted Cook and Chinese Tea Eggs

Do you remember seeing those funny looking eggs sitting on bars or resting on plates in Chinese Restaurant windows - the ones with the funny lines all over them? And did you wonder what they were? And if anyone ever ate them?

Well never fear - the Distracted Cook took the latest Daring Kitchen challenge and guess what it was?? Right! Chinese Tea Eggs!

Sarah from Simply Cooked was our November Daring Cooks’ hostess and she challenged us to create something truly unique in both taste and technique! We learned how to cook using tea with recipes from Tea Cookbook by Tonia George and The New Tea Book by Sara Perry.

They were really fun to make and the ingredient list was about as short as it can get.
Here it is:


Yes, that is the complete list! Eggs, tea bags, salt, and chinese five spice. The first thing to do is to put the eggs in a pan and cover them with cold water, just like this:


After you let them simmer for 12 minutes, you remove them from the pan and tap them with a spoon so that the shells are cracked all over, just like this egg is:


Then they all go back into the pot of water and you add the two tea bags, salt, and five spice. Cover the pan and heat gently for an hour.  After the hour is up, let the eggs sit in the covered pan for 30 minutes.


Take one of the eggs out of the water and peel it to be sure it is dark enough. If so, peel the rest of the eggs.


Arrange the eggs in a container. When you are ready to eat them, slice or quarter them and sprinkle some toasted sesame seeds on top. Enjoy!

Now, didn't that look like a smart, fun, and easy thing to do? You can have just as much fun if you join us at The Daring Kitchen. Come on, you know you want to have as much fun as we all are. We'd love to see you next time!

Thursday, October 27, 2011

The Distracted Cook is a Baker?

Would you bet, ever, that the Distracted Cook could get it all together long enough to actually complete a Daring Bakers Challenge and photograph it, and then serve it up for dessert? Hah! Well, you just might win this bet if you did. Yep, actually did it this time!

The Daring Baker’s October 2011 challenge was Povitica, hosted by Jenni of The Gingered Whisk.  Povitica is a traditional Eastern European Dessert Bread that is as lovely to look at as it is to eat!

At the first reading it looked really complicated, and when Jenni told us to go grab a sheet to roll the dough on, I almost chucked the recipe into the bin and took a pass. But, I am so glad that I decided that it was just complicated enough to possibly give us some comedy subject from which to work.

So, Povitica, here we come - better get out of the way. Of course, if you want to see how it really looks, go to The Daring Kitchen and take a look at the wonderful results that everyone got. Of course, it takes a special kind of person to be brave enough to post their results out there for the entire world to see. And no, I am not that brave. But since you are here, you can see what came out of my oven this afternoon!


Yes, this is what resulted when The Distracted Cook actually followed the recipe. It was hit and miss, as it always is in this kitchen. Instead of making four of these wonderful cake-loaves, I opted to do the version for just one. And since Jenni gave us all the measurements, it was a walk in the park.


Making the dough was really easy and fun. It is always fun when things go the way they are supposed to. But that doesn't always happen in the Distracted Kitchen.


Rolling the dough out until it was so thin you could see through it got to be quite a challenge in itself. But, just as Jenni said, roll it until you think it is thin enough, then roll some more. So I did.


Next thing to do was to put the filling onto the rolled dough. Walnuts, cinnamon, sugar, cocoa, butter - what isn't to like about this? After spreading it all over the dough came one of the BIG challenges. Roll it up! Yep, roll it up.


Now I know what you're thinking about now. Sure, this is going to turn into something that looks good and tastes even better? No way, you say? WAY!


There it is - all rolled up and snuggled into a loaf pan and now it gets to rest for 15 minutes while the oven heats.


 And then in it goes for about 45 minutes until it is golden brown on the top. Then it has to rest for about 25 minutes. Well, that is suggested. But if you are like The Distracted Cook, you can't wait that long. And so, the knife comes out and off comes a slice. Oh yes! Totally worth the challenge. If you'd like to try this yourself, visit The Daring Kitchen where you will find the recipe. And while you're there, sign up and join us for the next round in the kitchen. It is never dull. It is always something new. It is always fun. And the best part? Even if you create a dismal failure, it is always fun to hide the evidence by eating it before anyone can see it!

Friday, October 14, 2011

The Distracted Cooks Attempts Moo Shu

This started out to be a regular, timely response to The Daring Cook's October challenge. Little did I know that a surprise dinner would intervene and upset the best (well almost best) laid plans!

The October Daring Cooks' Challenge was hosted by Shelley of C Mom Cook and her sister Ruth of The Crafts of Mommyhood. They challenged us to bring a taste of the East into our home kitchens by making our own Moo Shu, including thin pancakes, stir fry and sauce.

The Distracted Cook made numerous trips to the grocery to be sure that everything was on hand for the big day. Thursday was going to be a special day because there was a party to attend before dinner. So using the advice in the recipe, the dough was made ahead and after being wrapped so tight it almost exploded was placed in the refrigerator to wait until showtime.

Likewise, all the ingredients for the pork were sliced thinly and placed into containers to sit on the shelf beside the dough.

And then came the fun part - mixing up that Hoisin Sauce. That was actually fun and it contains a lot of my favorite flavors, especially the sesame oil. After this was made and set on that shelf with the rest of the "dinner" I knew the evening would be a smashing success.

Now the rest of the story. That party? Just an in-and-out cocktail hour to say hello and chat a while?  SURPRISE!  It's going to be a dinner party instead - just decided ten minutes before we arrive. Well, The Distracted Cook is not a Dummy Cook! A dinner at a great restaurant/wine bar is not to be dissed just because Moo Shu is slumbering in the fridge at home. Oh no, indeed not. So, this post will start now ...and continue later tonight AFTER the Moo Shu has been created. A day late, maybe a dollar short, but definitely not a "fail" in The Daring Kitchen.

Come back later this evening to see all the pictures and the resulting dinner. In the meantime, go visit The Daring Kitchen to see what everyone has posted so you have an idea of what to expect back here (don't get too carried away though, sometimes what you see is NOT what you get here!) While you are in The Daring Kitchen, why not sign up and join us? Read all about it and just think of all the fun you can be having with the rest of us! Really.

Tuesday, September 27, 2011

The Distracted Cooks Makes Croissants!


There you have it! A tray of croissants. I never thought the day would come that The Distracted Cook would even attempt such a thing, much less actually do it. Well....

The Daring Bakers go retro this month! Thanks to one of our very talented non-blogging members, Sarah, the Daring Bakers were challenged to make Croissants using a recipe from the Queen of French Cooking, none other than Julia Child!

We were encouraged to use the original recipe, and Sarah even included a link to a video showing Julia Child making them also. I wish I could say mine turned out as lovely as I am sure Julia's were. Not even close, but they are good.


One of the fun parts of the recipe was slamming the dough down on the board about 10 times before putting it in a large bowl to rest for a while, well, actually it was three hours!


Here is the dough right before the plastic bag was placed over the bowl until the dough had tripled in size.


After taking the dough out of the bowl and pressing it into a rectangle, I folded the dough like a letter. Top third down and the bottom third up and on top. And the, back into the bowl for another rest. This resting is good - you can clean the kitchen and dream of hot flaky croissants for breakfast - or dessert if you put a square of chocolate in them.


After the dough has rested, place it in the refrigerator on a plate covered with plastic wrap. Take a stick of well chilled butter and flatten it out on the counter. Take the dough out of the refrigerator and unroll it and spread it into a 14 x 8 inch rectangle. Place the large rectangle of butter that you flattened onto the dough. Fold it into thirds as before, and then turn it 90 degrees. After you have it turned, roll it out again to the full 14 x 8 inches and folded it again, wrap it in plastic and back into the refrigerator it goes for another two hours.


After another two hours in the refrigerator, it is time to cut and shape the croissants. Cut the dough into two rectangles, placing one back in the refrigerator. Roll the remaining dough out until it is 15 x 5 inches. Cut it into thirds, which will give you three 5x5 inch squares. Place two of these squares in the refrigerator to keep cool. Cut the remaining square into two triangles. Roll one up from the long end to the point. There you have it! It's beginning to look like a croissant!


Roll, cut, and shape the rest of the dough and place on a buttered cooking sheet. Cover with plastic wrap and let it sit for an hour. In the meantime heat your over to 475 degrees . Mix an egg with one teaspoon water, and lightly brush the tops of the croissants. Put them into the preheated oven and bake for twelve to fifteen minutes. And then --- NO, let them cool on a rack! Then you get to eat them!

If you would like to try this recipe or join in the fun with the Daring Bakers, just visit The Daring Kitchen. Here you will find the recipe and pictures of some of our efforts. And you can sign up right there and join us in the Daring Kitchen for the next challenge. See you there!


Wednesday, September 14, 2011

The Distracted Cook and Makes Chicken Soup


It is a really good thing that The Daring Cook's challenge was to make a stock and then use it in a soup. Because shortly after The Distracted Cook started looking at recipes, the dreaded "summer cold with delightful sore throat" got me in its clutches and is still hanging around as I type this. Believing in the Old Wives' Tale that Chicken Soup cures all ills, I decided it would be Chicken Stock and Chicken Soup that I made in this challenge. I also was attempting, once again, a sourdough starter into wonderful bread recipe so that just about settled it once and for all. Chicken Stock into Chicken Soup with Sourdough Bread as an accompaniment. Good Luck!

Peta, of the blog Peta Eats, was our lovely hostess for the Daring Cook's September 2011 challenge, "Stock to Soup to Consomme". We were taught the meaning between the three dishes, how to make a crystal clear Consomme if we so chose to do so, and encouraged to share our own delicious soup recipes.

If you are reading a lot of the Daring Cook challenge blogs, you will notice that in each one we all have a particular paragraph such as that above that is the same in each blog for the month. That is what holds us all together as Daring Cooks and it is by us all using these same words that we are allowed to participate again the next time around. If YOU would like to participate with us, just visit the The Daring Kitchen and read all about what we are doing and sign up to join in the fun. I promise you will be glad you did!

I first started off the sourdough starter so that by the time the soup was ready the next day the bread would be ready to bake. Here is what the starter looked like after I fed it and let it sit on the counter for a few hours:


Having gotten that started I began the chicken stock adventure. I have always loved to make chicken stock and rather than using one of the recipes that Peta provided, I decided to use the one I usually make. First I put two pounds of chicken wings cut into pieces, along with two tablespoons of olive oil, into a roasting pan and into the hottest oven they go. Just like this;


 They will roast in there for about 45 minutes or until they are nice and brown. I scrape up all the bits and then throw a scraped and chopped carrot in with them along side half a stalk of celery, chopped, and half an onion chopped. Into that I toss  four peeled cloves of garlic.


 It all gets stirred up and then shoved back into the oven for another 20 minutes. Be careful, if your oven is one that really gets hot you might end up with bits and pieces of charcoal -- I speak from experience.

After the chicken and vegetables are done, pull the pan out and put it on top of the stove. Add six cups of cold water, bring it to a boil and then turn down to a simmer and let it cook for 30 minutes. Let it cool slightly and then strain through a fine mesh strainer. After it was strained, I poured it into a big stainless steel bowl and refrigerated it overnight, which means in the morning I could lift the fat layer off. I wish that I had taken a picture of this - it was the nicest, darkish brown stock that I have made in a long while. I usually don't bother straining it because I immediately turn it into soup. I was contemplating the Consomme challenge, but my better sense got a hold of me and I declined.


I wish I could say that I took pictures of the next steps, but I didn't do that either! About that time I started sinking into the depths of misery that a cold brings with it. The next day I did  decide rather quickly to chop 2 carrots and  2 large stalks of celery and throw them into the pot that I had poured the stock into. I removed the layer of congealed fat and thought about what to do with it, but just threw it back into the fridge until I knew what I figured it out! I added about a cup of fresh corn off the cob and a handful of lima beans from the garden to the other vegetables and let it simmer until they were tender. Then I added some chopped tarragon along with some diced cooked chicken left over from a roast the night before. And then I sat and waited until it was nice and steamy hot all the way through. And then....ahhh. There is nothing better to soothe a sore throat than Chicken Soup made from your own home made Chicken Stock. Oh yes, the bread?


I almost had a success there. It is getting better, I must admit. And the next time there is a Soup Challenge in The Daring Kitchen I will hope to have a really good loaf to go with my soup!

Saturday, August 27, 2011

The Distracted Cook Plays Candy Land


The Distracted Cook loves to play board games. And one of everyone's all time favorites is Candy Land. Remember sitting on the floor in the living room with your friends or sister playing until your Mom told you to come set the table for dinner? We couldn't get enough of that game. And now, The Daring Kitchen has a new version for us. And The Distracted Cook just couldn't wait to sit down and give it a try.

The August 2011 Daring Bakers’ Challenge was hosted by Lisa of Parsley, Sage, Desserts and Line Drive and Mandy of What the Fruitcake?!.  These two sugar mavens challenged us to make sinfully delicious candies!  This was a special challenge for the Daring Bakers because the good folks at http://www.chocoley.com offered an amazing prize for the winner of the most creative and delicious candy!

The challenge was to make two different kinds of candy. One of these candies had to be a chocolate version and the other was up to the cook. Making truffles was one of the options and that is what The Distracted Cook opted to do, along with making up one candy of her own. That might not have been the best idea around, but it sure was fun.


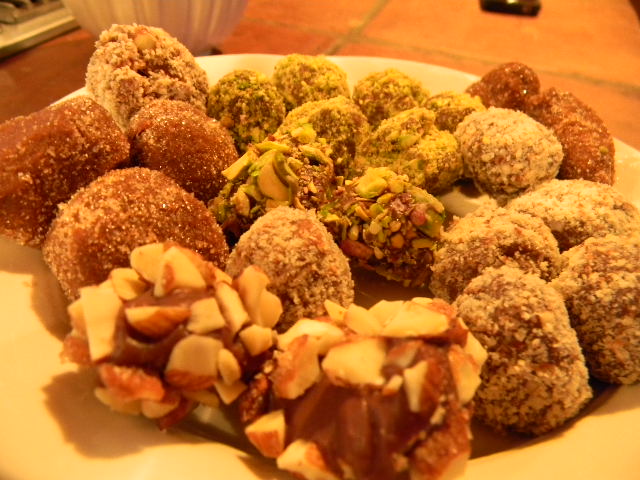
The Truffles were fun to make and even more fun to eat. Some were rolled in a mixture of paprika and sugar, some in finely chopped nuts (pistachios and some almonds that had been candied with cayenne, sugar, and truffle honey), and the rest in coarsely chopped nuts. Here is what it looked like while they were being made:


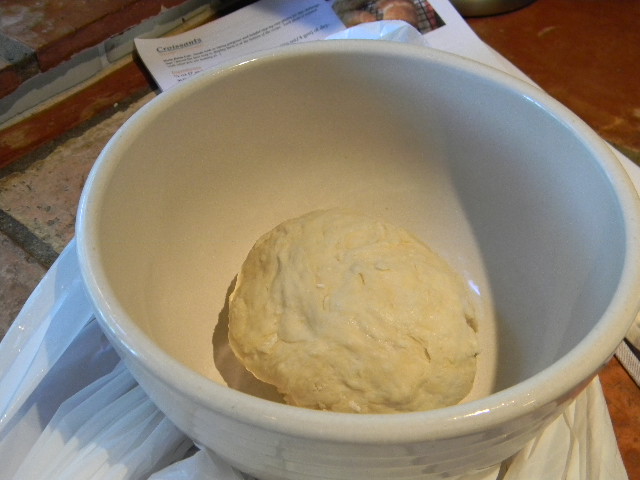
Here is the chocolate and hot cream mixture before being stirred and making sure all the chocolate is melted and ready for the ganache to cool and thicken.


After the ganache cools, using a scoop or teaspoon to remove some from the bowl, it is formed into a small ball and rolled in the nuts or sugar mixture.


The Truffles are really delicious, and the left over ganache is going to be experimented with to make a topping for some ice cream!


For the second candy, The Distracted Cook decided to make up a recipe of her own. Now this is indeed a lofty undertaking, especially since The Distracted Cook knows absolutely nothing about making candy. Period. There was a container of really lovely yellow cherry tomatoes on the counter and that gave me an idea. My Grandmother used to make the most wonderful tomato preserves that was sweet, tomatoe-y, cinnamon-ginger tasting and I used to eat it like it was candy. So? Let's try making one of those fruit jelly candy things but use the tomatoes instead of fruit - and isn't the tomato a fruit?


First step was to put two cups of the tomatoes and 1 cup of sugar in the pan and cook it to 235 degrees on that candy thermometer. That was easy enough.


Here the tomatoes were before being dumped into the pot with the sugar. I also added a teaspoon of lime juice and two small basil leaves. Following a recipe that I found for fruit jellies, I took 1 Tablespoon of gelatin, 2 Tablespoons of lemon jello (just because I had it left over from a cake recipe and thought it would be good in here) and 1/4 cup of water and combined them.


After the tomatoes cooked to the 235 degrees, I poured the mixture into the gelatin-jello mixture and stirred it to combine it well. Then I used some non-stick spray to coat an 8x8 inch baking dish and poured the candy in.


I let it sit on the counter for about 10 minutes, then slid it into the fridge to cool down. I had also put the Truffles in there so that they would firm up.

And then came the true test - a tasting of the experiment in candy making. I must admit, the tomato candy is different. It's not bad. It wouldn't win any awards. And I am thinking that if I dipped the squares into chocolate, it would be outstanding.

The Distracted Cook enjoyed the day in the kitchen making candy, stretching the bounds and definitions a bit, and tasting the results. I think you might enjoy doing all of this yourself. And it is really easy. And fun! Join us. All you have to do is register with The Daring Kitchen.

Wednesday, July 27, 2011

The Distracted Cook Bakes a Fraisier

Jana of Cherry Tea Cakes was our July Daring Bakers' host and she challenges us to make Fresh Frasiers inspired by recipes written by Elisabeth M. Prueitt and Chad Robertson in the beautiful cookbook Tartine.

Of course, not everyone has fresh strawberries hanging around the garden, so Jana gave us creative license to create the basic recipe using other berries or fruit. Blueberries were calling my name, so The Distracted Cook thought they were worth an attempt.

The first decision was whether to follow the recipe for a basic chiffon cake or to use one of the variations. Blueberries and lemon seemed to be a good match, so that is what was baked in our kitchen.


I must say that the lemon variation is absolutely delicious. I had never made a chiffon cake from scratch (or any other way, come to think about it.) All of the beating and folding and separating of eggs was a real fun job, and the end result certainly tasted good enough to pass muster.


Egg whites are beaten until they hold a soft peak - almost ready!


After beating the egg whites they are gently folded into the egg yolk mixture just like in the picture above. Then into the prepared pan, and into the oven. After baking and cooling the cake can be stored in the refrigerator for up to four days - which is a good thing because you can then do the other steps and not worry about the cake. And even before this, you can make the simple syrup and refrigerate it also. I added some Limoncello to my syrup for another boost of lemon flavor.


Making the pastry cream is the next step and that also may be done in steps over a few days. This is a really convenient recipe!


Next comes the final assembly and final refrigeration before cutting and serving. After splitting the cake, lining the springform pan with plastic wrap and inserting the bottom of the cake back into the bottomless form, it is time to play with the design of the blueberries around the sides. Talk about fun. And every berry that fell over or rolled around had to be eaten - right then! After you manage to get the entire  pan lined with some berries you begin piping the pastry cream around them. The rest of the blueberries are then set in the middle of the cake and everything is covered with the rest of the pastry cream except for a few tablespoons that you save aside. And don't forget, when you cut the cake into two layers, you brush each layer with the simple syrup so that it soaks up that lemon sweetness. This is one of the real secrets of the wonderful taste. The other is that you roll out a very thin (not thick like mine ended up being) circle of almond paste to set on top of the top layer of cake. I dusted some powdered sugar over the top of that layer and put the entire thing to sleep until dinner time (or at least four hours so that it all those flavors get to soak in together.) The time in the refrigerator also allows the pastry cream to set so that it all doesn't end up on the floor when you release the springform and remove the plastic wrap from around the sides.


This is what the finished Fraisier looked like. Yes, those are pretty big blueberries!


And this is what my piece looked like before it disappeared.

Why don't you have some fun in the kitchen baking with us? Just join The Daring Kitchen and we'll see you back here next month.

Thursday, July 14, 2011

The Distracted Cook and My Noodle Hands!

Steph from Stephfood was our Daring Cooks' July hostess. Steph challenged us to make homemade noodles without the help of a motorized pasta machine. She provided us with recipes for Spatzle and Fresh Egg Pasta as well as a few delicious sauces to pair our noodles with!

This time The Distracted Cook knew it would be great. Home made pasta? What fun. And having someone in the kitchen to help - what could be better? Lucy was here for the week and is always eager to help out at the stove. So, with the aid of her cookbook, Emeril's  There's A Chef In My Soup we got started.


You might be wondering about the sunglasses? Well, Lucy informs me that when you are cutting or cooking raw onions you must wear your sunglasses or else you end up crying into your soup - or sauce! So, here she is stirring up the onions for the sauce she was making for our pasta. Emeril's recipe was an easy one for Lucy to make and it is really good. And while it was simmering away on the back of the stove, Lucy and the Distracted Cook decided to tackle the pasta making. First though, Lucy had to run around outside and get rid of some extra energy. Back in the kitchen without her special "at the stove" shirt on, we got down to pasta business.


The next step was to sift the flour into a large mixing bowl. This is where we parted company for a while. Lucy made her pasta with an old recipe on hand - flour, water, salt. She used our Giusto's Organic "00"  flour  for her pasta and I used plain old unbleached all purpose flour for my noodles using the recipe that Steph posted.


This is what Lucy's dough looks like after she has incorporated the water into the sifted flour and salt.


And this is what The Distracted Cook's dough looks like after mixing the eggs, flour and water.


And this is what they look like ready to be wrapped and set to rest. Can you see the difference in Lucy's dough and The Distracted Cook's dough? The addition of the eggs makes the dough on the far left hand side of the picture have a yellow color rather than the lighter white color of Lucy's dough.


And here they are wrapped in their plastic wrap and taking a rest! After they rested, the two cook's ran  Lucy's dough through the pasta cutter and The Distracted Cook decided to hand roll and cut hers just as she used to do with her Grandmother!


Here is some of the dough ready to be cut into noodles.


And here the cut noodles are just waiting to be unrolled and set out to dry a bit before being dumped into boiling water.


Aren't they great looking? Cutting them by hand was a lot easier than running them through the pasta cutter. BUT, using the pasta machine to cut them made them a lot thinner. The Distracted Cook will have to practice a lot more with that rolling pin. Grandma used to do the rolling, and The Distracted Cook used to cut them and unroll them and hang them up to dry!


Fresh cut noodles waiting to jump into the pan!


After about 5 minutes in the boiling water, The Distracted Cook removed the noodles and drained them.


Noodles! Waiting for that great tomato sauce that Lucy made - and some meatballs also.


And now it's dinner time! Fresh egg pasta fettuccine with homemade tomato sauce. What a delightful way to answer The Daring Cook and her challenge. Thanks to Steph for such a fun adventure! Why don't you join us next time? All you have to do is go to The Daring Kitchen and register. The rest is just as easy and twice as much fun. See you next challenge!